Wednesday 31 July 2013

Packing Tips

In preparation for going to Ecuador, I have begun to pack... mainly just to check that I can fit everything in my bag. I normally procrastinate and saving packing until the night before (as I do with everything else in life) but I am determined to break this habit as I pack for Ecuador. Here are some of the ways I pack things in my bag in order to make sure everything stays compact and organized. I have to thank many of my leaders to showing me these packing techniques; I've found them very helpful and thought it would be great thing to pass onto others.

Sleeping bags often take up a lot of space. Many of them come with their own bags, some of them pack up your sleeping bag pretty well, others not so much. A compression sac is a great way to reduce the amount of space your sleeping bag takes up. They come in various sizes/volumes, all with the purpose of making whatever you put inside as small and compact as possible.

Left: Bag that came with my sleeping bag, Right: Sleeping bag in compression sac


Two words: PLASTIC BAGS. Yes, those plastic zip-up bags. Ever seen those infomercials where the woman puts the clothes in the massive clear bag, attaches her vacuum, and then the bag shrinks down to become flat and compact? This is a similar idea on a less grand scale. Better organize your clothing by separating it into tops, bottoms, undergarments, rolling and placing them in separate freezer-size plastic zip-up bags. Suck out the air with a straw and "ta-da"! Now all of your clothing is contained and less likely to be mixed up and thrown about while searching for that fresh pair of socks. Your clothing will also remain dry in the case that your tent floods or bag comes into contact with water.

Fold and roll the clothing tightly so that it is slightly smaller than the width of the bag

5 T-shirts easily fit into one freezer bag!

Extra large plastic zip-up bags can also be used to store your sleeping bag and pillows when out and about. At GM2010 in Guelph, Ontario our leaders provided us with these bags and instructed us to pack up our bedding every morning. This saved our bedding from becoming damp on more than one occasion!

Wednesday 24 July 2013

Ecuador Ed-Venture Clothing and Logo

Exciting news... I just received my Ecuador Ed-Venture clothing and crests! Each participant had the choice of either a T-shirt or 3/4 length shirt and a pull over or zip-up hoodie. Both the shirt and sweater have our Ecuador Ed-Venture logo on the front, as well as Girl Guides of Canada and the trefoil on the left shoulder.


 I am thrilled with how the logo/crest design turned out. A girl in our group came up with the main idea for the crest, and with input from the rest of the girls and leaders this is the final design:


The world and people are a reference to the Free the Children logo, the organization that we are supporting by going on this trip. The maple leaf on one person represents Canada, and the rose represents Ecuador. The crest design also has the GGC trefoil (of course!) and the Me to We logo. Me to We supports Free the Children in many ways, mainly by organizing volunteer trips to countries such as Kenya, India, Ghana and Ecuador. We Day is great way to learn about their organization and how to get involved in a variety of projects, both large ones overseas and small things you can do at home. If you have the opportunity to go to We Day I highly encourage you go!

Sunday 21 July 2013

17 Sleeps!

The final prep before going to Ecuador has begun! The nice little pile in my living room is slowly beginning to grow... first simply a backpack and gloves, it now includes a sleeping bag, various T-shirts, uniforms and socks. Due to the culture of Ecuador our group has to be careful as to what clothing items we wear. Spaghetti strap tank tops, V-necks, and shorts above the knees are all clothing items we have to avoid. Being a teenager means that my closest consists mainly of those items, and I therefore have a fair amount of shopping to do. I recently made a trip to MEC, where I picked out a new sleeping bag and a compression sac. When choosing what compression sac would work best, the employee helping me showed me two sacs, one smaller and the other larger. He recommended I go with the larger one because I might have trouble packing up the sleeping bag into a smaller sac. That was when I looked at him and said, "Give me the small one, it'll be fine. I'm a Girl Guide." He chuckled and proceeded to help me with other items. (I'll add that when I got home I had no trouble at all packing my new sleeping bag up; my Mom was quite impressed.... )

I have to thank my family, friends, and anyone and everyone I have come into contact with recently... I can barely contain my excitement and hope you don't mind my constant chatter about this upcoming trip. Ecuador is the furthest away from home I have ever been, and the idea of going to another country to making a difference in the lives of others is something I am very excited to do. I have been anxiously awaiting this journey for just over a year now. The fact that is it so close is incredible.

Thanks for checking out my blog. I look forward to sharing my stories of Ecuador with all of you and hope you continue come back to read my future posts. Thanks again, and have a lovely day!


Sunday 14 July 2013

Journey to Churchill

In July 2012, my unit took the unbelievably long train ride up to Churchill, Manitoba. Since I am going back there for a couple days this summer (by plane, thankfully) I thought I'd share a bit of our trip last year:

After a two-day train ride, looking out your window and seeing nothing but prairie, we arrived in Churchill. We got on a little bus and rode to the Northern Studies Centre. It's a great new building that is big and bright. It has an awesome "Aurora Dome", a spiral staircase leading to a large bubble in the roof. It made for a great place to read and relax. After a quick tour around the Centre and a quick explanation of how to avoid being eaten by a polar bear we built model rockets and went outside to launch them. Anytime we walked outside, a fair distance from any building or safe structure, we were accompanied by a person with a rifle: our polar bear protection. It was a little odd at first, but it was nice knowing there was someone looking out for you. We all wanted to see a polar bear, maybe not while we were launching model rockets, but at some point during our trip. You see, there was a "Polar Bear Sightings" whiteboard inside the centre and we were determined to write on that board... even though everyone told us our chances of seeing a polar bear were slim. Well, we didn't see one polar bear on our trip, we saw three!

Looking down into the main entrance of the Studies Centre

The steps up to the Aurora Dome

The Aurora Dome had a beautiful view of the sky!

These signs were all over the place. I was very happy when we went shopping and found a crest that resembles these signs

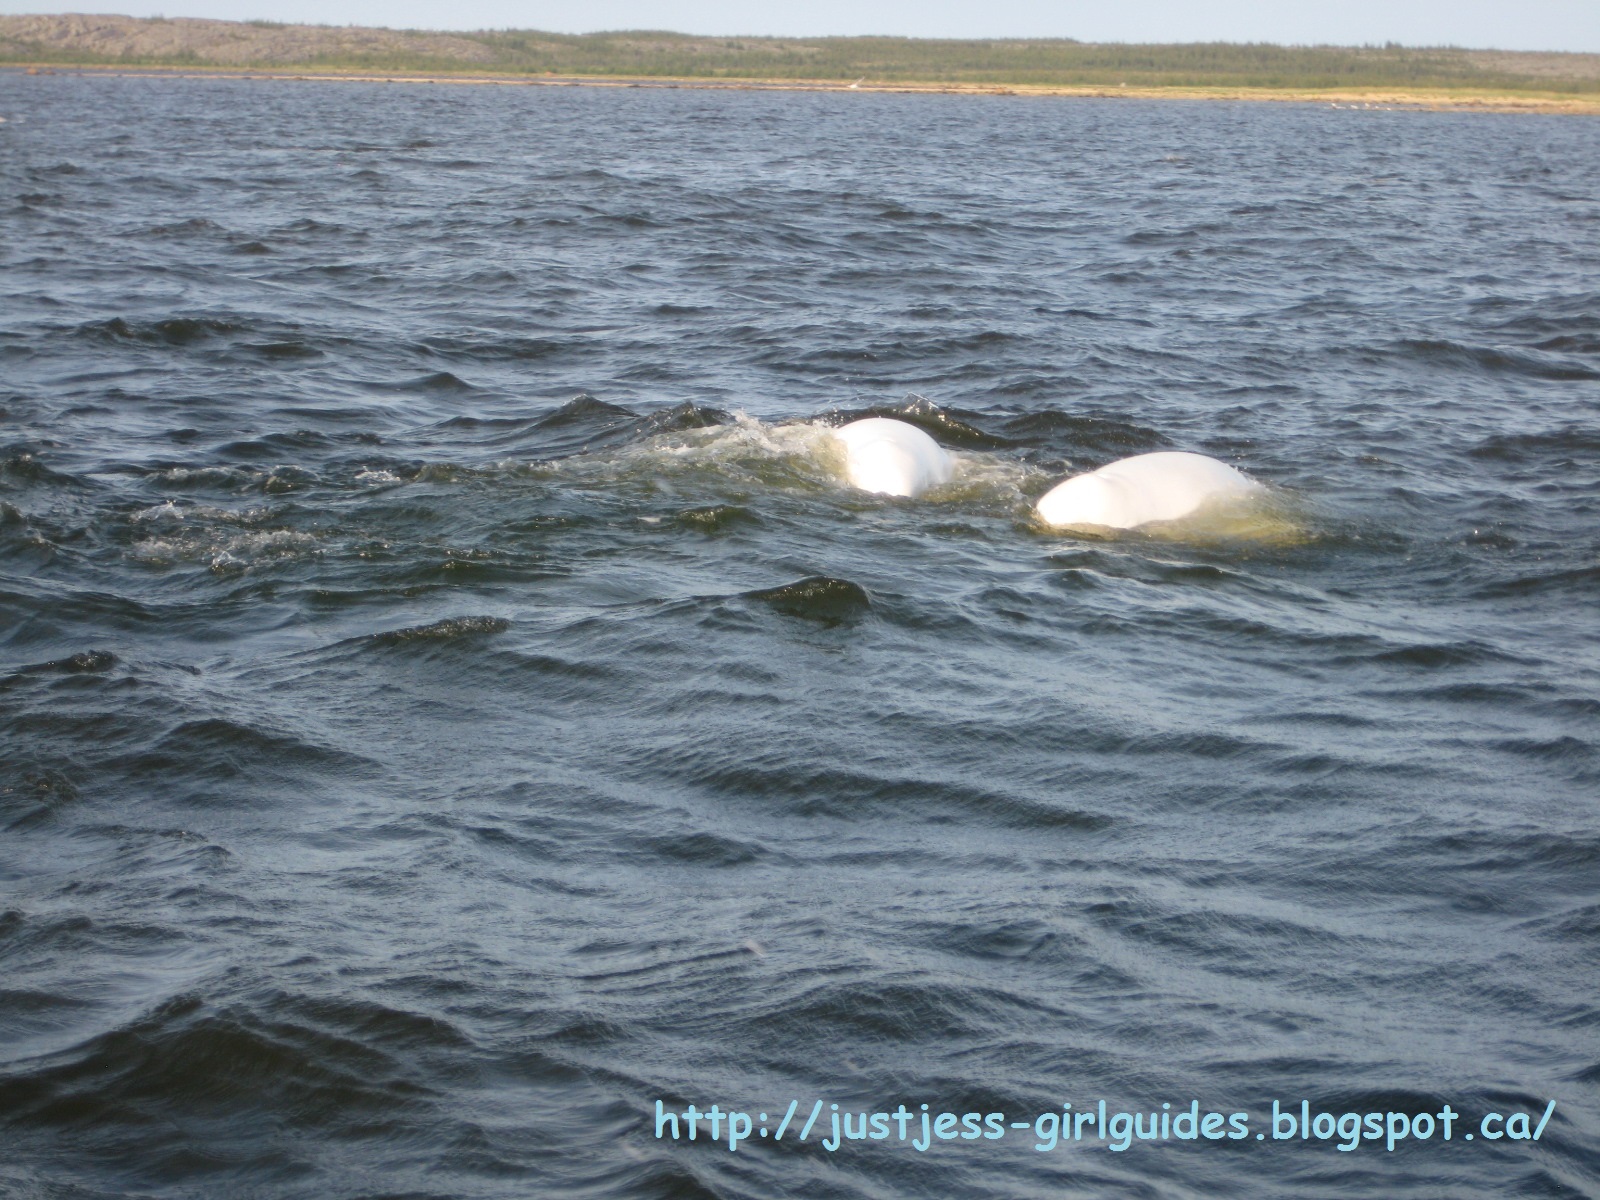
Our first polar bear sighting was while we were Beluga Whale watching. After watching the playful white whales and their adorable grey baby's, our tour guide took us for a tour of Prince of Wales Fort. We were accompanied by two men, one who I nicknamed "Ranger Gord" (a Canada Parks officer) and the other riding a quad. They both told us to keep an eye out for polar bears since they seemed to frequent this particular area. As luck would have it, we did! It was a fair distance away, on Eskimo Point, so we quickly and quietly jogged back to our boat, hopped in, and went to get a closer look at our first polar bear. Although we got a little closer in our boat the polar bear was still extremely far away and tiny looking; only a camera with an incredible zoom could get a half decent picture. Still, we had accomplished our goal: we saw a polar bear.

Belugas

Prince of Wales Fort

Inside the Fort

I Spy with my little eye a polar bear... Can you spot it?


Our next polar bear sighting had to be the most exciting. That day we got on an enormous Tundra Buggy and journeyed out into the Tundra. Our tour guide took us to the spot where the ashes of Debbie (the world's oldest polar bear) were spread, and began a presentation on polar bears. A short while later a polar bear was spotted in the water swimming towards the shore. We all immediately pulled out our cameras and binoculars, and began to silently wait. The polar bear made its way all the way up to our Tundra Buggy before continuing down the path. It was an incredible, being less that 10 feet away from a polar bear, and being to get such amazing photos.

The Tundra Buggy is like a monster truck-school bus that has a large deck on the back

It's coming towards us!

I think she's looking for Girl Guide Cookies...

This demonstrates just how close she got to us in the Buggy

We added our sightings to the Polar Bear Sightings board

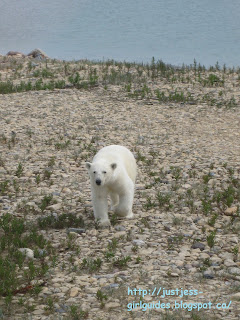
Our final polar bear sighting was on our last day in Churchill, and completely unexpected. Behind the huge building that houses the school, hospital and much much more, there is a wooden boat play structure type thing that looks out onto Hudson's Bay. Apparently all of us girls were a little too crazy so our leaders had us go play on the boat to let off some steam. Just as we were loading back up on the bus a polar bear appeared on the shore. We all quickly took our seats and watched it. In the blink of an eye two large trucks appeared and proceeded to direct the bear away from town.

This boat was a great place to have lunch!

Our final polar bear sighting


During our touring of Churchill we also visited the Camp Nanuq and Caribou Hall. Camp Nanuq is a Girl Guide and Boy Scout camp just outside of Churchill that we would have stayed in, had we not be able to stay at the Northern Studies Centre. As much as staying at Camp Nanuq would have been cool, having to go outside to the outhouse was a bit of a turnoff, especially with the potential threat of polar bears. In town we drove by Caribou Hall, a cool looking building where the Girl Guides have their meetings. It was nice to see how Girl Guides have left their mark on Churchill... especially since the entire population of Churchill is about 2/3 of that of my High School!

Camp Nanuq sign
The lovely facilities at Camp Nanuq

     Caribou Hall

We had many other great experiences in Churchill such as going for a tour of the tundra, kayaking with beluga whales, dog carting, caribou hair sculpting, seeing Miss Piggy (crashed C46 plane, not the Muppet), the Ithica, Eskimo Museum, the polar bear "jail" and of course, shopping down the one main street. One of the best parts of the trip had to be bonding with the other girls. This trip strengthened our friendships tremendously, and I am extremely thankful for that... even if it means never looking at "bug wipes" the same way again. Overall it was an incredible experience, a trip that I would recommend to anyone and everyone.


The belugas loved following the kayaks

Polar bear "jail" sign

Miss Piggy

Beluga swimming under our boat

Friday 12 July 2013

Craft Idea

Today's Craft Idea: Boo Boo Bunnies
A cute little friend to cuddle with or make your boo-boos better!
What you will need:
- face cloth
- elastic band
- yarn or ribbon
- small and large pom-poms
- buttons or googly eyes
- fun foam
- hot glue gun or white glue

Lay out your wash cloth and begin tightly rolling one corner to the middle.


Tightly roll the opposite corner to the middle so the two rolls meet.


Fold the rolled cloth in half so what used to be the bottom is now facing the outside. Secure with an elastic about 1/3 down the cloth from the fold. This creates the body.


Fold the two ends of the cloth back up towards the elastic. Tie a piece of yarn or ribbon around it. This creates the head and ears.


Glue a large pom-pom on the back for the bunny's fluffy tail.


Use buttons or googly eyes, a small pom-pom and thin pieces of fun foam for the bunny's eyes, nose and whiskers.


Your boo-boo bunny is now complete! An ice cube fits nicely into the body of the bunny to help sooth your boo-boos. I hope you enjoyed today's craft. If you have any comments, questions or concerns feel free to leave a comment below. Have a lovely day!


Wednesday 10 July 2013

Fun Finds

If you set a metre high stack of card-stock in front of me and told me to put it in "rainbow order" I would happily sit there for hours sorting the colours till I was satisfied. Now, put me in my room and tell me to clean out my closets and it's barely five minutes before I decide I've had enough. You can image I wasn't very happy when my Mom asked me to help her sort through some boxes and clean out the hall closet... Though now, I can honestly say I'm glad she did. While cleaning out the boxes, making decisions on what was a cute keep-sake and what was just taking up space, we came across a mysterious old Q-Tip box. We opened it up to reveal long lost treasure: some of my Mom's old Brownie and Girl Guide badges. I eagerly ran downstairs to grab my own box of Brownie badges and Guide sash and we began comparing what her badges were like mine. The biggest change had to be in the Brownie badges, from the old brown and gold triangles to the present day orange-trimmed octagons. I was in Brownies during the transition from the brown rectangular badges with the green, yellow and red trim to the most recent badge design. When I was younger I was a little upset that my badges looked different. Now I think it's really cool to see how they have changed.


Although the shape has changed, I absolutely adore the Circle Emblems. I love how the Brownie characters and style have remained the same, even after all these years.

Mom's Elf and Sprite on the left, my Nymph and Fairy circle emblems on the right

Moving onto the Guide badges you can see that not much has changed since my Mom was a Girl Guide. The embroidery on today's badges is of course a lot more elaborate, but the shape and style remain the same. I love how both my Mom and I earned some of the same badges, I think it's really cool that I can say that. Here are some of my Mom's badges next to my Guide sash:


You know I think I might just like cleaning a little more now, knowing it may lead me to treasures like this...


Monday 8 July 2013

Delicious Camp Hat Craft Ideas

My favourite camp hat crafts are often the ones that resemble food. I don't really know why, I guess I just like tiny food that I can't eat. Anyways, I thought I'd share some camp hat craft ideas with you! I have either made these crafts or received them through a trade. I hope you enjoy these yummy and adorable camp hat crafts!

Fortune Cookie

Taco

S'more

Cotton Candy
Thanks to J & D from Nova Scotia for this awesome cotton candy!

Sundae

Cookies
Thanks to the Rangers from New Brunswick for this adorable pan of cookies!

Bacon and Eggs in Frying Pan

Girl Guide Cookies
Thanks to S from Alberta for making these cute sandwich cookies!

Peas in a Pod


If you have any comments or questions about these camp hat crafts go ahead and leave a comment below! :)